Growing Taro Root: How to Plant, Care for, and Harvest Taro
Growing Taro Root
Growing taro root kicks off best in warm, damp conditions—plant the corms in rich, loamy soil and keep the ground consistently moist. Full or partial sunlight suits taro perfectly, and regular feeding with organic compost boosts growth. Be sure to plant taro roots 3 to 4 inches deep for healthy foliage and hearty tubers, then read on to master harvesting and enjoy your homegrown bounty.
Table of Contents
Cheatsheet: Planting & Harvesting Your Own Taro Patch
🌱 Site & Soil
- Warmth: Needs 77–95°F / 25–35°C for best growth
- Moisture: Thrives in soggy or very damp soil
- pH: Prefers 5.5–6.5
- Sun: Full sun to partial shade
🛠️ Tools and Products You'll Need
- Shovel or trowel
- Watering can or hose
- Mulch
- Gloves
- Compost or organic fertilizer
- Sharp knife (for harvest)
- Taro corms (disease-free starts)
- Organic compost
- Mulch material
🧑🌾 Plant
- Plant corms 2–3 in / 5–8 cm deep
- Space 18–36 in / 45–90 cm apart
- Water well—keep soil constantly moist
- Mulch to retain humidity & suppress weeds
🌾 Nurture
- Feed monthly with compost or balanced fertilizer
- Never let soil dry out
- Remove weeds by hand
- Protect from frost—taro is frost-sensitive
⏳ Harvest
- Harvest 8–12 months after planting
- Wait until leaves yellow and die back
- Lift corms with fork or shovel
- Use gloves—taro sap irritates skin
- Cure corms in shade for 3 days
🥗 Benefits
- Rich in fiber, potassium, & vitamins
- Starchy root—satisfying & filling
- Grows where little else thrives
- Provides up to 10 lbs / 4.5 kg per plant (yield)
Growing Taro Root: plant, care, harvest
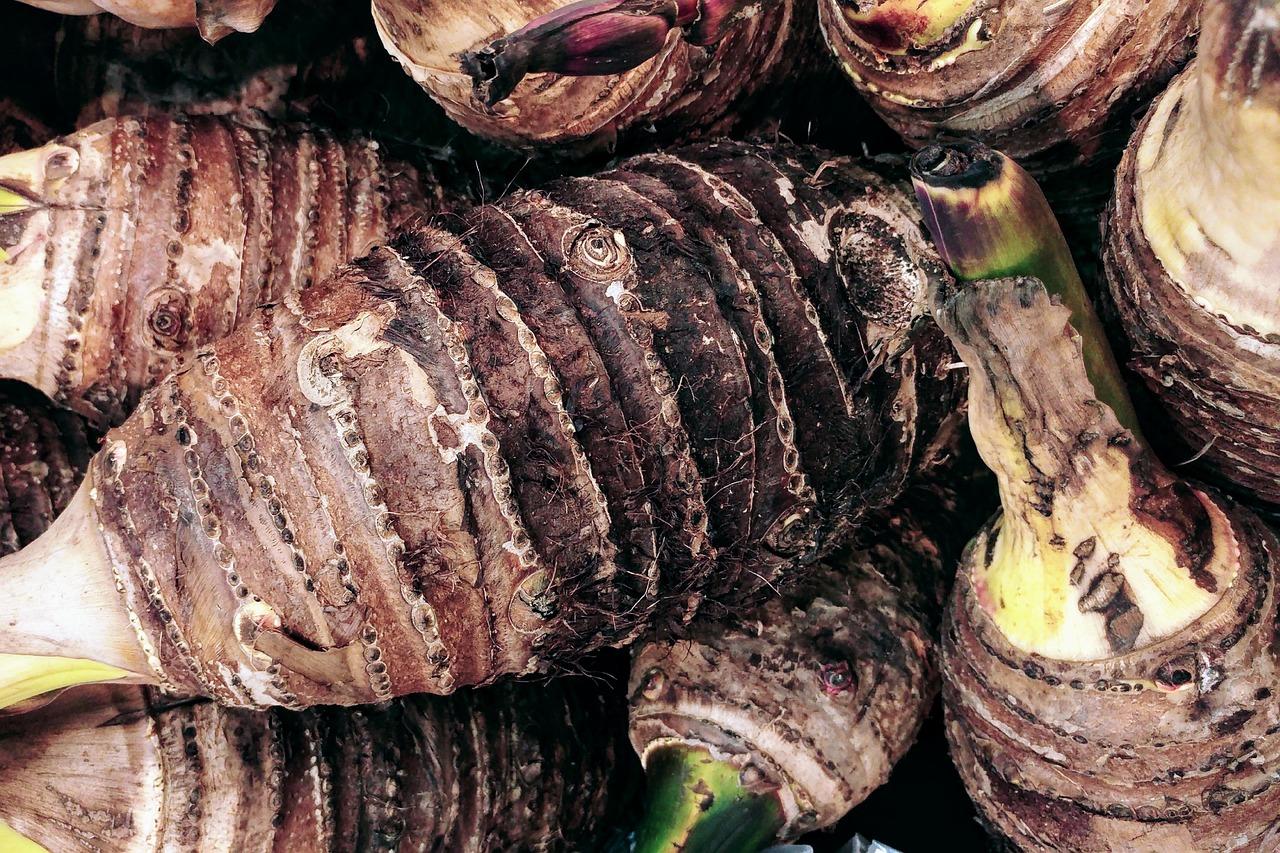
I grow Growing Taro Root for its starchy corms and velvet leaves, and I treat it like a slow, steady crop that pays you back big. Colocasia esculenta likes heat, water, and patience.
Taro comes in upland and wetland types, with two culinary groups in play. Dasheen forms one large corm, while eddoe forms clusters of smaller cormels.
Climate, timing, and site
Taro thrives in steady warmth with soil temps above 70 F, 21 C. I plant once nights sit above 60 F, 16 C, and frost risk has passed.
Expect 7 to 12 months to maturity, depending on variety and heat. In USDA zones 9b to 12 you can grow year round, and in cooler zones use containers or season extension.
Full sun powers yield, yet I give afternoon shade in scorching summers. Leaves scorch in hot wind, so I use windbreaks or taller companions like bananas.
Seed pieces, huli, and sourcing
Plant huli, which are corm tops with a bud and a slice of petiole, or chunks of corm with at least one eye. I prefer clean, disease-free planting stock from reputable nurseries or certified farms.
Grocery corms can sprout, though they may carry pathogens. Check local regulations on plant imports, and quarantine any store-bought starts in a separate pot.
Soil and bed prep
Taro wants rich, friable soil with high organic matter and a pH around 5.5 to 6.5. I work in 2 to 4 inches, 5 to 10 cm, of compost plus a mineral blend that leans high in potassium.
For wetland types I line a sunken bed with heavy plastic and set a simple overflow to keep water below the crown. Upland types prefer raised beds with constant moisture and excellent drainage.
Planting details
Set huli or sprouted corm pieces 2 to 4 inches deep, 5 to 10 cm, with the bud pointing up. Space 18 to 24 inches, 45 to 60 cm, in rows 30 to 36 inches, 75 to 90 cm.
I mulch heavily with clean straw or chipped leaves right after planting. Mulch stabilizes moisture, suppresses weeds, and buffers heat.
Water and moisture management
Taro drinks like a distance runner. Keep soil constantly moist, never dry, and avoid stagnant, anaerobic conditions in upland beds.
Moist, warm soil grows taro fastest. Err on the side of more water with steady oxygen at the root zone.
In paddy beds I aim for shallow standing water that never floods the crown. In upland beds, drip lines or soaker hoses make moisture management simple.
Feeding the crop
Taro is a heavy feeder with high demand early for nitrogen, and later for potassium and calcium. I start with a balanced organic fertilizer at planting and side-dress nitrogen at 6 to 8 weeks.
At bulking, I boost potassium with sulfate of potash, not muriate, since chloride can stress taro. Foliar seaweed helps during heat spikes or wind stress.
Containers and small spaces
A single plant wants at least a 15 to 25 gallon, 57 to 95 liter, container. Use a peat-free, compost-rich mix, and water daily in summer.
I sub-irrigate tubs with a small reservoir to eliminate dry spells. Half-barrels produce handsome corms if you keep plants fed and warm.
Sun, temperature, and season length
Optimal growth lands around 77 to 95 F, 25 to 35 C. Leaves sulk below 60 F, 16 C, and frost kills the canopy outright.
In cool climates I pre-sprout huli indoors on a heat mat, then transplant once soil warms. Black mulch helps at elevation where nights run chilly.
Pests and diseases
Watch for aphids, spider mites, taro planthopper, and root-knot nematodes. Strong airflow, clean starts, and predatory insects keep populations in check.
Taro leaf blight, Phytophthora colocasiae, can strip foliage fast in warm, wet weather. I reduce leaf wetness, remove infected leaves, and favor resistant varieties when available.
Snails and slugs will lace new leaves. Iron phosphate baits and tidy borders keep them honest.
Harvest signs and technique
I harvest when the plant slows, lower leaves yellow, and petioles thicken. In my garden that ranges from 6 to 10 months for eddoe types and 9 to 12 for dasheen.
Loosen soil with a fork and lift the crown in one piece. Snap off cormels and leave the crown intact if you plan to replant quickly.
Postharvest handling and storage
Rinse soil, then cure corms for a few days in warm shade with good airflow. Skins set and cuts dry, which extends storage.
Store at 50 to 55 F, 10 to 13 C, with high humidity. Refrigerators run too cold and cause chilling injury and flavor loss.
Safety and cooking
Raw taro contains calcium oxalate crystals that itch like fiberglass. I wear gloves to harvest and peel, then cook thoroughly.
Leaves and petioles are edible after full cooking. Long simmering or pressure cooking neutralizes the bite and coaxes a nutty aroma.
Yield expectations
Healthy plants in warm soils produce 1 to 3 kilograms per plant, 2.2 to 6.6 pounds, with upland beds on the lower end. Paddy beds and long seasons deliver bigger corms and more cormels.
FAOSTAT reports global taro output around the tens of millions of metric tons each year. That speaks to taro’s role as a Pacific and African staple crop.
Pro tips from seasons in the mud
- Plant shallow at first, then hill soil around the base as petioles elongate.
- Keep crowns just above the waterline in wet culture to prevent rot.
- Use SOP for potassium, and add gypsum to supply calcium without shifting pH.
- Thin crowded suckers so one or two dominate for larger corms.
- Rotate away from solanaceous and cucurbit crops to limit nematodes.
Top varieties for home gardens
- Bun Long, dasheen type with large, clean corms that slice well for chips.
- Eddoe types sold in Asian markets that sprout easily and suit containers.
- Lehua Maoli, Hawaiian selection with good texture for poi and baking.
- Samoan Pink and Blue Taro, regional lines with leaf blight tolerance in humid sites.
I trial two or three lines each year and keep the one that bulks fastest in my soil. Local performance beats catalog copy every time.
Alternatives and close cousins
- Xanthosoma, malanga or yautia, uses similar culture with a drier preference.
- Giant taro, Alocasia macrorrhizos, yields huge petioles but needs extra heat.
- Ornamental Colocasia, like Black Magic, grows like taro though flavor and texture vary.
These cousins share feeding habits, so your taro fertilizer plan will carry over. Just tune water and shade to the species.
Buying guide and gear
- Source huli or corms from specialty edible plant nurseries with clean-stock programs.
- Use a broadfork or spading fork to avoid spearing corms at harvest.
- Install drip tape on 12 inch, 30 cm, spacing for even moisture in raised beds.
- Choose a sulfate of potash fertilizer and a slow-release nitrogen for containers.
Ask suppliers about cultivar names, maturity windows, and any disease screening. Skipping those questions costs more than the plants.
Troubleshooting fast
- Leaves pale and small: feed nitrogen and check root health, then increase water.
- Leaf edges burn: add shade in afternoons and raise humidity with mulch.
- Plants topple in storms: hill soil and stake petioles with soft ties.
- Corms spongy after storage: temps were too low, keep them around 50 to 55 F, 10 to 13 C.
Why this crop keeps me honest
Taro teaches patience and timing. Miss a week of water in July and it remembers.
I have lifted plants that looked modest on top and found a bowling ball beneath. The quiet crops keep secrets until harvest, which is half the fun.
Helpful references
University of Hawai‘i CTAHR offers detailed production guides for Hawaiian systems and varietal notes. Their guidance on huli prep, water, and nutrition tracks with my field results.
FAOSTAT summarizes global taro and cocoyam production data. Cornell, UC ANR, and CTAHR bulletins cover pests like taro leaf blight and cultural controls with practical detail.
Frequently Asked Questions About Growing Taro Root
What soil conditions best support taro plants?
Taro thrives in rich, loamy soils that stay consistently moist and drain well. Blend organic compost into the soil before planting to supply nutrients and maintain ideal moisture levels. Slightly acidic to neutral soil, with a pH range of 5.5 to 6.5, promotes healthy root growth.
How much sunlight do taro plants require?
Taro plants prefer partial shade to bright indirect sunlight. Direct sunlight during extremely hot afternoons may scorch their broad leaves. Providing dappled shade through trees or shading structures creates suitable growing conditions for vigorous foliage.
How frequently should you water taro?
Maintain consistent moisture by watering taro regularly, ideally keeping the soil slightly saturated but not standing underwater. Aim to water once or twice a week, providing enough moisture to permeate at least 12 inches (30 cm) deep, adjusting frequency according to rainfall and climate conditions.
What temperatures suit taro cultivation best?
Taro grows best in warm conditions, ideally between 70°F to 85°F (21°C to 29°C). Protect plants from temperatures below 50°F (10°C), as lower temperatures can slow growth and damage foliage. In cooler climates, consider planting taro in containers to move indoors during colder months.
How do you fertilize taro plants effectively?
Apply a balanced, slow-release fertilizer at planting time to promote steady nutrient availability. Supplement periodically with a nitrogen-rich organic liquid feed or compost tea every four to six weeks to encourage vigorous leaf and corm development.
What signs indicate taro roots are ready to harvest?
Harvest taro roots approximately 7 to 9 months after planting, when leaves begin to decline and turn yellow. Carefully remove the soil around the base to assess corm size—mature taro corms typically measure 4 to 8 inches (10 to 20 cm) in diameter and feel firm to the touch.
How can you safely handle and prepare harvested taro?
Raw taro contains calcium oxalate crystals, causing irritation if eaten raw or handled without protection. Wear gloves when harvesting and handling, and thoroughly cook taro by boiling or baking until tender to fully eliminate any irritants before consumption.
Growing taro root rewards patience and attention. Start with rich, moist soil, and keep those roots well-watered—taro won’t forgive a dry spell. Shade helps, but don’t skimp on sunlight.
Watch for pests, and harvest only when those leaves yellow and corms feel firm beneath the soil. If you’re after unique flavors or want to try your hand with other intriguing edibles, mashua or tiger nut might be your next plotmates.
Mastering growing taro root brings a taste of the tropics straight to your backyard, and nothing beats pulling your own corms from the earth after months of care. Here, patience pays off—one harvest at a time.