Growing Painted Hill Corn for a Colorful Summer Harvest
Growing Painted Hill Corn
Growing Painted Hill Corn starts with picking a sunny spot and working compost into well-draining soil. Sow the colorful kernels directly outdoors once soil temps hit 60°F to get vigorous germination. Keep rows about 30 inches apart and thin seedlings to a foot spacing—follow these moves and you'll soon harvest ears bursting with sunset-hued kernels. If vibrant, edible artistry speaks to you, keep reading for tips to savor your own Painted Hill Corn bounty.
Growing Painted Hill Corn: the short-season rainbow that tastes like summer
I grow it for the color, then keep it for the flavor. The ears look like a confetti cannon and still steam up sweet and creamy.
What Painted Hill corn is, and why it shines
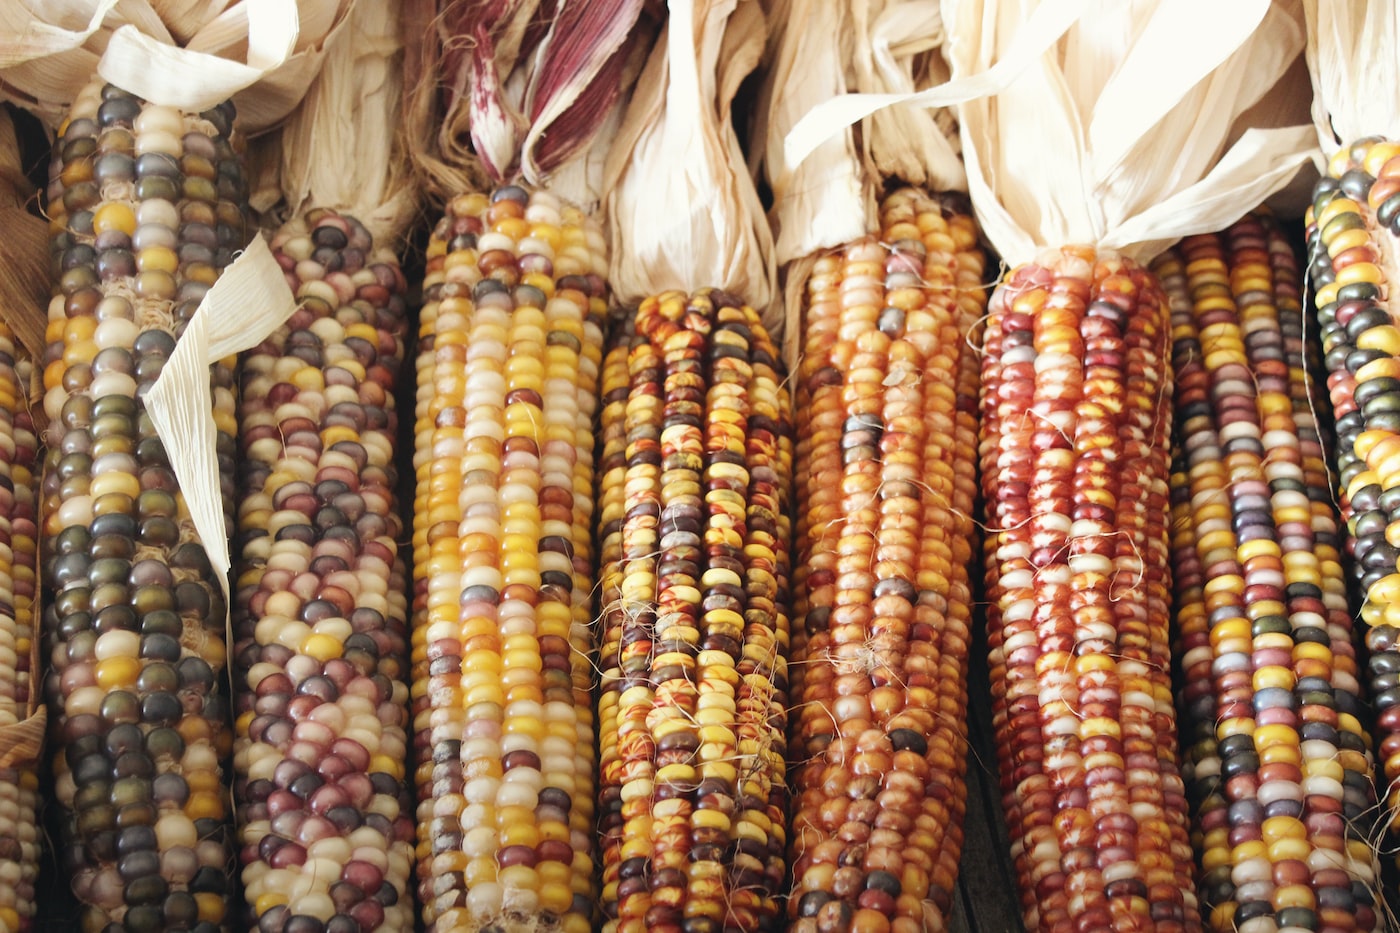
It is an open-pollinated sweet corn bred from Painted Mountain and Luther Hill, so it marries color with early sweetness. I see 70 to 85 days to harvest, 6 to 8 inch ears, and a wild palette at dry stage with softer pastels at eating stage.
The kernels are standard sugary type, so the harvest window is brief and worth catching. Eat young for sweetness, save later ears for drying and meal.
“Plant sweet corn in blocks for pollination, not a single long row.” Cornell Cooperative Extension notes that pollen is wind-borne and silks must catch it for full ears.
Site and soil prep that pays off
Full sun, eight hours or more, and a fertile loam at pH 6.0 to 6.8. I work ground when the soil crumbles in the hand, never when it smears.
- Before sowing, I blend in 3 to 5 pounds of 5-5-5 per 100 square feet, or compost plus a nitrogen source.
- Corn loves nitrogen, so I plan a side-dress later rather than dumping it all up front.
- Cover crops like oats or crimson clover leave the bed open and airy for strong root run.
Sowing timing and spacing
Wait until soil holds 60 F, 16 C, for three days, then sow. Cold seed rots, and this variety rewards patience.
- Sow 1 to 1.5 inches deep in cool soil, 2 inches in warm soil, 2.5 to 5 cm.
- Space 8 to 12 inches apart, 20 to 30 cm, in rows 30 to 36 inches apart, 75 to 90 cm.
- Block-planting: four short rows beat one long row for pollination.
- Succession plant every 10 to 14 days for two or three waves.
“Each silk equals one potential kernel.” University of Minnesota Extension reminds us that full ears require steady pollen shed and healthy silks.
Feeding and watering
Corn drinks, then eats, then drinks some more. I target 1 to 1.5 inches of water weekly, 25 to 38 mm, and mulch once soil warms.
- Side-dressing: when plants hit 8 to 12 inches tall, I scratch in about 0.15 to 0.25 pounds actual nitrogen per 100 square feet, then repeat at pre-tassel if leaves pale.
- Yellowing on the lower leaves signals hunger, not mystery.
Color chemistry, explained simply
The reds and purples come from anthocyanins, the golds from carotenoids. Sunlight and maturity deepen pigments, so milk-stage ears look pastel and the drama arrives as ears dry.
Cool nights bring sharper color on dry ears in my plot. Warm nights sweeten the eating stage but mute the final palette a touch.
Pollination control, flavor, and seed purity
Sweet corn cross-pollinates with other corn nearby, which can turn kernels starchy if popcorn or field corn sheds pollen into your patch. I give 250 to 300 feet, 75 to 90 m, of isolation or stagger by two weeks between silking times.
Kernel color can shift with incoming pollen on some colored types. If you plan on seed saving, bag tassels and ears and hand-pollinate to keep the line clean.
Pest and problem playbook
- Corn earworm: 3 to 6 days after silks appear, add a drop of mineral oil mixed with Bt into each silk channel.
- European corn borer: spray Bt into the whorl at pre-tassel, repeat weekly while pressure lasts.
- Raccoons: three strands of low electric fence at 6, 12, and 18 inches, 15, 30, 45 cm, keeps midnight raids brief.
- Birds: slip paper bags over nearly full ears, leave room for air, remove at harvest.
- Smut (Ustilago maydis): pick galls before they burst and remove from the patch. Or sauté as huitlacoche, your call.
- Leaf diseases: rotate yearly, water at soil level, and keep rows airy.
Harvest cues and handling
I harvest when silks turn brown, husks still tight, and a punctured kernel weeps sweet milk. Painted Hill shines for about 3 to 5 days per planting, so taste daily.
Chill immediately at 32 to 36 F, 0 to 2 C, to slow sugar loss. UC Davis Postharvest research reports rapid conversion of sugars to starch at warm temperatures, which is why field heat removal matters.
Kitchen notes, fresh and dry
Grill it naked over hot coals, eat it raw right in the rows, or cut it into a skillet with butter and thyme. The flavor leans sweet, mineral, and a little wild compared to supersweets.
Let late ears dry on the stalk, then finish on racks at 95 F, 35 C, with airflow for meal or hominy. The color gets loud as it dries, which makes the pantry look like a festival.
Seed saving checklist
- Pick the first, healthiest, earliest maturing plants to select for earliness.
- Isolate 300 to 600 feet, 90 to 180 m, or bag and hand-pollinate.
- Let ears dry fully on the plant, then cure until kernels shatter under a firm bite.
- Shell, winnow, label, and store cool and dry with a desiccant.
Where I buy, and what to compare
Look for Painted Hill from Peace Seedlings, Adaptive Seeds, Fedco Seeds, or Seed Savers Exchange. Expect 75 to 200 seeds per packet, usually in the 3 to 6 USD range for untreated or organic lots.
- Painted Mountain: flour type, dazzling dry color, excellent for short seasons, not sweet for fresh eating.
- Hooker’s Sweet: open-pollinated, old-school sweetness, good cool-soil vigor, pale kernels.
- Black Aztec: heirloom that eats sweet young, dries to black meal with depth.
- Glass Gem popcorn: jaw-dropping dry ears, pop it, do not expect sweet fresh eating.
- Supersweet hybrids like sh2 types: longer harvest window and higher sugar, less complex flavor, isolate from su types.
My field notes from a hungry summer
Tighter spacing at 8 inches, 20 cm, gave me shorter plants, steadier ears, and fewer lodging headaches in a windy year. A light hand with nitrogen sharpened flavor, heavy feeding bloated stalks and dulled sweetness.
The most color showed on plantings that tasseled after a cool front, and the best sweetness came from beds that never dried down between irrigations. I learned to pick in the cool of the morning and carry a cooler to the rows.
FAQ for Growing Painted Hill Corn
- Is it GMO: no, it is open-pollinated and stable enough for home seed saving with isolation.
- Will popcorn nearby ruin it: yes, pollen can make kernels starchy, so isolate by distance or timing.
- How many ears per plant: usually 1 to 2, with a few bonus nubbins in rich ground.
- Container growing: half-barrel volume with 10 or more plants in a block can work, keep water steady.
- Days to harvest: plan on 70 to 85, faster in heat, slower in a cool spring.
References I trust
- University of Minnesota Extension, Sweet Corn in Home Gardens, for soil temperature thresholds and pollination basics.
- Cornell Cooperative Extension, Growing Sweet Corn, for block planting and silk biology.
- UC Davis Postharvest Technology Center, Sweet Corn, for sugar to starch conversion and cooling guidance.
- USDA and state Extension pest guides, for timing controls on earworm and corn borer with Bt and cultural practices.
Cheatsheet: Vivid Ears of Painted Hill Corn
🌱 Soil & Planting
- Soil: Loamy, pH 6.0–6.8, rich in compost
- Temp: 60–95°F / 15.5–35°C
- Plant: Direct-sow after frost, 1" deep/2.5 cm, 8" apart/20 cm
- Rows: 18–30" / 46–76 cm apart, minimum 4 rows for pollination
💧 Water & Care
- Water: 1" / 2.5 cm per week, deep & regular
- Weed: Mulch to suppress weeds, hand-pull as needed
- Fertilize: High-nitrogen at knee-high growth
- Monitor: Pinch off side shoots (suckers) if dense
🌽 Harvest & Storage
- Days to mature: 100–110
- Pick: Silks brown, kernels plump, press for milky sap
- Dry: For flour or decoration, leave ears on stalk until husks dry
- Store: Cool, dry, and dark for up to 6 months
⚒️ Tools and Products You'll Need
- Painted Hill corn seeds
- Organic compost or manure
- Mulch (straw/grass clippings)
- Starter fertilizer (high-N)
- Trowel or dibber
- Soil thermometer
- Watering can or hose
- Pruning shears (optional)
🦠 Pest & Disease Prevention
- Rotate crops yearly
- Use <1–2% neem spray for early worms/aphids
- Encourage ladybugs & beneficial insects
- Remove infected plants
🥗 Nutrition & Self-Sufficiency
- Antioxidants: Anthocyanins from colored kernels
- Whole grain: Use fresh, roasted, ground into polenta or flour
- Heirloom: Save seeds for replanting, pass down varieties
📝 Quick Steps
- Prep soil with compost, loosen to 8"/20 cm deep
- Sow seeds 1"/2.5 cm deep, 8"/20 cm apart in blocks
- Water thoroughly after planting
- Mulch once seedlings are 4"/10 cm tall
- Fertilize at knee-high stage
- Weed, thin to single healthy plants per spot
- Harvest when silks brown & kernels glow with color
Frequently Asked Questions about Growing Painted Hill Corn
What soil conditions best support healthy corn growth?
Painted Hill Corn thrives in fertile, well-draining soil enriched with organic compost. Aim for a soil pH of 6.0 to 6.8, ensuring consistent nutrient availability for vigorous plant growth.
How much sunlight will Painted Hill Corn require each day?
To achieve optimal growth, provide your corn plants with a minimum of 6 to 8 hours of full sun daily. Plants with ample sunlight yield fuller, more vibrant ears.
When is the ideal planting period for Painted Hill Corn?
Begin planting after the last expected frost, once soil temperatures maintain at least 60°F (16°C). Corn germination thrives best between 60°F and 95°F (16°C to 35°C).
What planting depth and spacing encourages healthy Painted Hill Corn?
Sow corn kernels approximately 1 to 1.5 inches (2.5 to 3.8 cm) deep, spacing plants 8 to 12 inches (20 to 30 cm) apart within rows. For vigorous pollination, keep rows roughly 30 to 36 inches (75 to 90 cm) apart.
How often should Painted Hill Corn plants be watered?
Provide consistent watering, supplying roughly 1 to 1.5 inches (2.5 to 3.8 cm) of water per week. Adjust watering frequency as needed, increasing during extended dry periods or heat waves.
What steps prevent common pests from affecting corn growth?
Practice crop rotation and introduce beneficial insects like ladybugs or lacewings to naturally control pests. Inspect plants regularly and promptly remove affected stalks or ears to minimize pest populations.
When and how can you harvest Painted Hill Corn?
Ears typically mature 80 to 100 days after planting. Harvest when silk is dry and kernels release milky liquid upon puncture. Twist and pull downward to detach ears cleanly, ensuring minimal disturbance to surrounding plants.
Growing Painted Hill Corn rewards patience and curiosity. This corn isn’t just eye candy—it’s a celebration of flavor, history, and resilience. Give it sun, space, and steady water. Watch as each stalk throws out ears streaked with wild color, a reminder that food can be art. If you want a garden that feeds both body and soul, Painted Hill Corn is your ticket. Pair it with companion crops like green beans or pumpkins for a nod to tradition and a boost to your yields. Harvest with care, and you’ll get kernels that brighten up any meal—or seed catalog. Growing Painted Hill Corn isn’t just about produce; it’s about creating something unforgettable, right in your backyard.