Growing Turmeric: Simple Steps for the Beginner Gardener
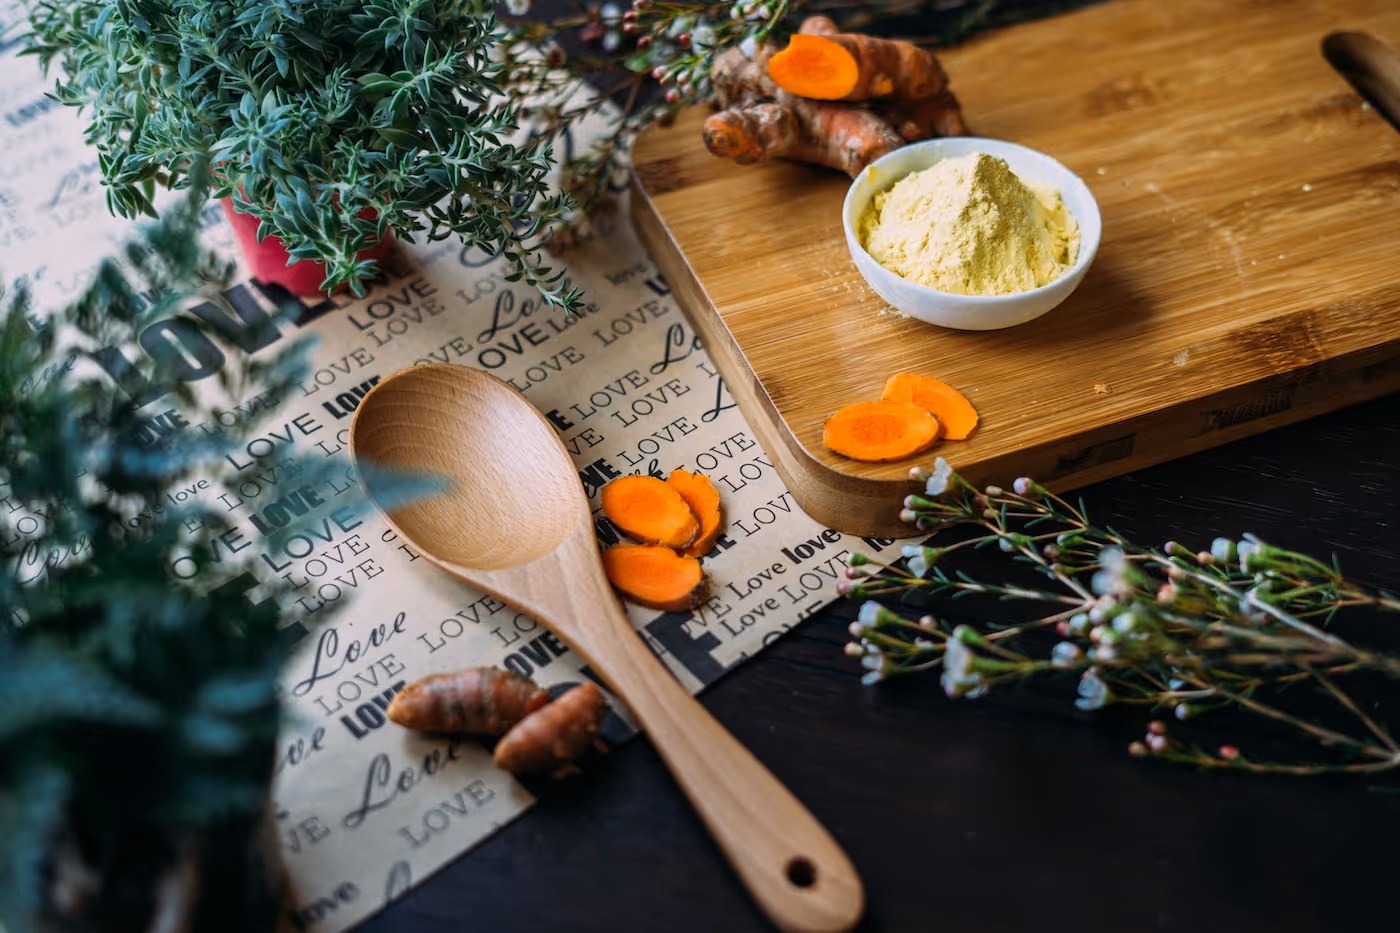
Growing Turmeric
Growing turmeric at home kicks up flavor in curries and teas, delivers anti-inflammatory benefits and thrives easily in containers or garden beds. Start by sourcing fresh rhizomes, plant them shallowly in rich, loose soil and keep them warm and well-watered. Within months, you'll harvest vibrant, earthy turmeric roots—read on to master the art of this vibrant spice.
Cheatsheet: Beginner’s Turmeric Planting & Harvesting
🌱 Choosing Rhizomes
- Buy organic turmeric rhizomes (roots) from a nursery or grocer
- Avoid shrivelled or mouldy pieces
- 1 rhizome = up to 5 plants
🔧 Tools and Products You’ll Need
- Sharp knife
- Containers (min. 12 in/30 cm deep) or garden bed
- High-quality potting mix
- Compost
- Mulch
- Gloves (optional)
☀️ Planting Location & Timing
- Start indoors if below 65°F/18°C
- Best temp: 70–95°F (21–35°C)
- Sun: Partial shade or filtered sunlight
- Plant Feb–May (Northern Hemisphere)
🪴 Planting Steps
- Cut rhizomes into 2-in (5 cm) chunks with 2+ buds
- Plant 2 in (5 cm) deep, buds facing up, 8 in (20 cm) apart
- Water well
- Keep soil moist, not soggy
- Add mulch to retain moisture
💧 Care & Maintenance
- Water 2× per week (more in heat)
- Feed with liquid fertilizer monthly
- Protect from wind
- Check for pests: aphids, spider mites
⏳ Harvesting
- Harvest after 8–10 months, when leaves yellow/brown
- Lift rhizomes gently with hands or trowel
- Yield: Up to 1–2 lbs (0.5–1 kg) rhizome per plant
❤️ Health, Nutrition & Self-Sufficiency
- Curcumin: natural anti-inflammatory
- 1 plant can supply household for a year
- Grow your own for fresher flavor and potency
📊 Quick Facts
- 80% of world’s turmeric grown in India
- Rich in: iron, potassium, antioxidants
- May boost immunity & digestion
-
Growing Turmeric: Simple Steps for the Beginner Gardener
Why Growing Turmeric belongs in your beds and containers
I grow Curcuma longa for flavor first, then for the color that stains my gloves like a badge of honor. This is a tropical perennial, so it thrives with long heat, rich soil, and steady moisture.
Turmeric rewards patience like low-and-slow barbecue. Once it settles, it bulks up quietly beneath the mulch.
India produces roughly 75 to 80 percent of the world’s turmeric, and most is still field grown in warm, humid regions. Source: FAOSTAT and Indian Council of Agricultural Research
Start right: clean seed rhizomes, not mystery grocery leftovers
Buy certified disease-free seed rhizomes from a reputable grower, because rhizomes are the swollen underground stems that carry disease along with buds. Grocery turmeric sometimes sprouts, but wax, irradiation, or latent rot can waste a season.
I look for plump pieces with 2 to 3 visible eyes and firm skin. Expect 30 to 80 USD per 2 to 5 lb starter box, or smaller packs for patio projects.
Timing and climate for Growing Turmeric
Plant when nights hold above 60 F, 16 C, and soil warms to 68 F, 20 C. Turmeric needs roughly 8 to 10 months of frost-free time to finish.
USDA zones 9 to 12 grow it outdoors, while zones 6 to 8 succeed by starting indoors 8 to 12 weeks before last frost. I like to pre-sprout in trays on a heat mat at 75 to 85 F, 24 to 29 C.
Turmeric typically reaches harvest in 7 to 10 months in warm conditions, with earlier digging for baby rhizomes and full maturity after leaf yellowing. Source: University extension bulletins from Hawai‘i CTAHR and UF IFAS
Soil recipe that keeps roots fat and happy
Blend a loose, fertile mix, pH 5.8 to 6.8, that drains fast yet holds moisture. My container recipe is 40 percent high quality compost, 30 percent coco coir or peat, 20 percent perlite or pumice, 10 percent aged bark, plus a handful of worm castings per gallon, 3.8 liters.
In ground, work in 2 to 3 inches, 5 to 8 cm, of compost and a dusting of rock phosphate and sulfate of potash at label rates before planting. Good tilth beats guessing later.
Planting: cut, cure, and set shallow
Slice large seed pieces down to 1.5 to 2 ounces, 40 to 60 g, each with at least one strong bud. Let cut surfaces dry 24 to 48 hours, and I dust with cinnamon or sulfur to discourage rot.
Plant horizontally 1.5 to 2 inches, 4 to 5 cm, deep with eyes up, spacing 12 to 16 inches, 30 to 40 cm. Rows sit 18 to 24 inches, 45 to 60 cm, apart for airflow.
Light, heat, and humidity
Turmeric loves bright, filtered light in hot regions and full sun in cooler summers. Aim for 70 to 95 F, 21 to 35 C, with humidity 50 to 70 percent to keep leaves lush.
Indoors I run full spectrum LEDs at 200 to 400 µmol m−2 s−1 PPFD for 12 to 14 hours, which is the measure of usable light plants receive. Leaves tell the truth, lime green means feed, droop means water or heat adjustment.
Watering that avoids the curse of rhizome rot
Keep soil evenly moist but never boggy, about 1 to 1.5 inches, 25 to 38 mm, of water per week early and 1.5 to 2 inches, 38 to 50 mm, in peak heat. I soak deeply, then mulch 2 to 3 inches, 5 to 8 cm, with shredded leaves or straw.
Containers dry faster, so I use a simple finger test to knuckle depth before watering. Frequent light sips invite shallow roots and trouble.
Feeding for bulk: nitrogen early, potassium later
I mix in a slow release organic base at planting, around 4-4-4, then drench monthly with fish and kelp when shoots surge. As clumps fatten, I shift toward potassium with a topdress of composted manure and a pinch of sulfate of potash at label rates.
Turmeric responds to calcium and magnesium too, so I fold in a little gypsum midseason. Leaf edges scorching often points to salt buildup, so I leach pots with clear water every few weeks.
Container Growing Turmeric
Use a wide container, 7 to 10 gallons, 26 to 38 liters, per plant with large drainage holes. Turmeric grows laterally before it bulks, so width beats depth.
I line the bottom with coarse bark to keep the drain path open. Fabric pots breathe well and curb waterlogging.
Varieties I trust for home gardens
- Lakadong: high curcumin, often 7 to 9 percent, vivid color, slow but worth the wait.
- Alleppey Finger: classic export type with bright orange flesh and a clean, peppery bite.
- Pragati: reliable yield, medium curcumin, finishes a bit earlier in temperate summers.
- Hawaiian Red: aromatic and tender when harvested young, lovely for fresh paste.
- Roma or Prabha types: uniform fingers, good for powder production, steady performers.
Buying guide: rhizomes, lights, and soil gear that pay off
- Seed rhizomes: order from specialty spice farms or seed tuber suppliers, look for disease testing and harvest year labeling.
- Grow lights: full spectrum LED bars with a dimmer and 200 to 400 µmol m−2 s−1 output at canopy height, 12 to 14 hour timer.
- Potting mix: peat free blends rich in composted bark and coir, plus extra perlite for drainage in humid climates.
- Fertilizers: organic base 4-4-4 or 5-3-3 for early growth, potassium rich amendments late season for rhizome fill.
- Tools: soil thermometer, moisture meter, heat mat, pruning snips, nitrile gloves, and a sturdy harvest fork.
My field notes that save time
I stagger plantings across two weeks, which spreads harvest and reduces the chance of a cold snap ruining everything. I also bury a temperature probe at 4 inches, 10 cm, because soil lies while air brags.
The scent of fresh turmeric hits like mango and wet clay. I still grin every time I rinse the first clump.
Common problems, clean fixes
- Slow sprouting: soil below 68 F, 20 C, or seed too dry, use bottom heat and lightly mist the bed surface.
- Leaf scorch or curl: hot, dry wind or salts, add shade cloth at 30 percent and flush containers with clean water.
- Yellowing between veins: magnesium hunger, a light Epsom salt drench, 1 teaspoon per gallon, 1.3 g per liter, often helps.
- Soft, smelly rhizomes: waterlogging and pathogens, improve drainage, reduce watering, and start with clean stock.
- Chewers like snails: copper tape on pot rims and early morning hand picks work fast without residue.
Organic disease and pest strategy
Good hygiene beats sprays, so I rotate beds, avoid soggy soil, and space plants for airflow. If leaf spots appear, I clip the worst, boost airflow, and apply a biological fungicide per label.
For mites or aphids, a weekly neem or insecticidal soap rinse under leaves keeps pressure down. Always spray at dusk to spare pollinators.
Harvest signs and how to pull without tearing everything
Plants signal maturity when leaves yellow and flop, usually 8 to 10 months after planting. For baby rhizomes, I side dig and take a few fingers, then backfill and keep watering.
I loosen soil with a fork 8 to 10 inches, 20 to 25 cm, away, then lift the whole clump. Wear gloves, the stain lingers like curry on a wooden spoon.
Curing, drying, and powder that tastes alive
For fresh cooking, a quick scrub and the skin rubs off with a spoon. For powder, I parboil whole rhizomes at 185 to 200 F, 85 to 93 C, for 45 minutes, then dry with warm air until brittle.
Dry to about 8 to 10 percent moisture, then grind in small batches and store airtight, dark, and cool. Keep seed stock unboiled and uncooked, since heat kills the buds.
Saving seed and overwintering
I pick the fattest, healthiest fingers for next season and cure them in the shade for a few days. Store at 55 to 60 F, 13 to 16 C, in slightly damp coir or peat at 60 to 70 percent humidity.
Check monthly and cull anything soft. One bad piece can spoil a whole tote.
Ginger vs Growing Turmeric, quick comparison
- Heat: both love warm soils, but ginger tolerates slightly cooler nights.
- Sun: turmeric prefers filtered sun in hot climates, ginger leans even more to part shade.
- Flavor use: ginger for zing and lift, turmeric for earth and color, I grow both to round out the kitchen.
FAQ for Growing Turmeric
How long to sprout. Expect 3 to 8 weeks depending on temperature and moisture.
Can I use grocery rhizomes. Sometimes, but you gamble on disease, storage treatments, and delays.
How many plants per person. Two to three plants yield plenty of fresh spice for a household that cooks often.
Shade cloth percentage. I use 30 percent in hot, inland summers to prevent leaf burn.
Quick checklist for a first, stress free crop
- Order clean seed rhizomes and hold warm and dry until planting.
- Pre-sprout with bottom heat and a light mist, then pot into a rich, airy mix.
- Keep temps 70 to 90 F, 21 to 32 C, and light bright but gentle.
- Water deeply, mulch well, and feed monthly, shifting to more potassium late season.
- Harvest when leaves yellow, cure for powder, and save the best for next year.
Trusted references that align with the practices above
University of Hawai‘i CTAHR and UF IFAS publish clear production guides for small growers. FAOSTAT and ICAR provide reliable global and varietal context.
I cross check with local extension soil recommendations for pH and amendment rates. That keeps my beds honest and my harvest predictable.
Frequently Asked Questions About Growing Turmeric
What is the best climate for growing turmeric?
Turmeric thrives in a warm, humid environment. Ideal temperature ranges between 68°F and 95°F (20°C and 35°C), with consistent rainfall or consistent watering. Cooler temperatures below 50°F (10°C) inhibit growth or cause dormancy.
How deep should turmeric rhizomes be planted?
Plant turmeric rhizomes about 2 inches (5 cm) deep in loose, well-draining soil, and space them approximately 12 inches (30 cm) apart. Proper depth encourages healthy root formation and easy harvest.
How much sunlight does turmeric require?
Turmeric plants grow best with bright, indirect sunlight or partial shade. Provide approximately 4 to 6 hours of indirect sunlight daily to encourage leafy growth and rhizome development. Excessive direct sunlight may scorch leaves, while too little will limit growth.
What type of soil is suitable for turmeric cultivation?
Turmeric prefers fertile, loamy soil rich in organic matter, with good drainage. A slightly acidic to neutral soil with a pH of 6.0–7.5 yields optimal growth conditions.
How frequently should turmeric plants be watered?
Water turmeric regularly to maintain consistently moist—but not soggy—soil conditions. Water every 2 to 3 days in hot and dry weather, reducing frequency slightly in cooler periods. Do not allow the rhizomes to remain waterlogged as this promotes rot.
When is turmeric ready to harvest?
Turmeric typically matures within 8 to 10 months after planting. Watch for leaves turning yellow and beginning to wilt, signaling readiness for harvesting rhizomes. Carefully dig up rhizomes, wash, and air-dry before storage or use.
Can turmeric be grown indoors or in containers?
Yes, turmeric grows well in containers and indoor environments. Choose a pot at least 12 inches (30 cm) deep with drainage holes, place it in a spot receiving indirect sunlight, and water regularly to ensure the soil remains moist.
Growing turmeric is a lesson in patience and reward. Start with a healthy rhizome, give it warmth, rich soil, and steady moisture, and the plant will do the rest. Harvest isn’t quick, but few things taste sweeter than pulling your own golden roots from the earth. Keep an eye on your soil, don’t let it dry out, and remember: turmeric thrives in filtered sun and humidity. Even a small garden or container can yield enough for your kitchen, bringing color and spice into your meals. If you’re itching to try more unusual crops, you might also enjoy growing mashua—another edible tuber with a bold twist. In the end, growing turmeric isn’t just about the harvest; it’s about getting your hands dirty and letting nature surprise you.
Health Benefits of Homegrown Turmeric
Powerful Anti-inflammatory Agent
Homegrown turmeric root contains curcumin, a bioactive compound reducing inflammation linked to chronic conditions like arthritis and heart disease.
Supports Brain Health and Cognitive Function
Regular turmeric consumption boosts levels of brain-derived neurotrophic factor (BDNF), a protein enhancing neuron growth and reducing cognitive decline risk.
Natural Digestive Aid
Fresh turmeric root stimulates bile production, improving digestion and nutrient absorption while mitigating bloating and discomfort.
Rich in Antioxidants for Cellular Health
The potent antioxidants in turmeric fight oxidative stress, limiting cellular damage and promoting healthy aging.
Strengthens Immune Response
Curcumin in turmeric enhances the activity of immune cells, fortifying defenses against infections and illnesses.
Homegrown Advantage: Optimal Nutrient Density
- Freshness maximizes curcumin potency lost in dried or powdered store products.
- Organically grown turmeric avoids chemical residues affecting overall nutrient content.
- Direct harvesting provides heightened nutritional value compared to commercially stored turmeric.
Recommended Intake for Health Benefits
Daily addition of approximately 1–3 grams (½–1½ tsp) fresh turmeric root grated into dishes or beverages yields beneficial health impacts. Combine with black pepper to enhance curcumin absorption significantly.
Find out which plants will thrive in your garden!
Answer a few fun questions and get custom plant recommendations perfect for your space. Let’s grow something amazing together!

start your season